Skip to content

Design / Build + Installation

March 2026 Hardscapes Step by Step

Solving drainage problems with a French drain

|
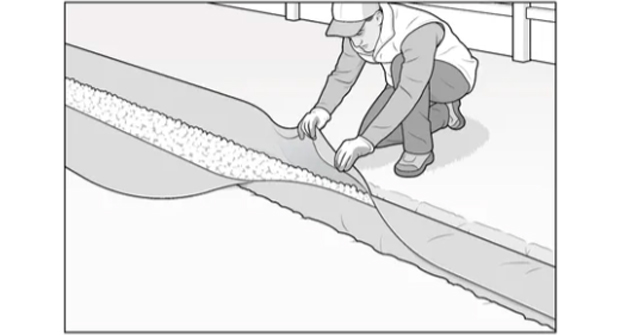
Backfill, wrap and finish. Cover the pipe with gravel up to a few inches of grade, fold the geotextile over to separate soil from rock and finish the surface with soil, sod or decorative stone tailored to the client’s expectations. (Illustration: David Preiss)

You’ve spent plenty of time and effort making a customer’s backyard a true showpiece. Innovative hardscapes. Attractive and site-appropriate plantings. Maybe you included an outdoor kitchen, a children’s play area or a fire pit. Everything screams “success.”

And then it rains … a lot. And both you and your customer realize there are drainage issues that need to be addressed immediately so they don’t turn a dream project into an ongoing nightmare.

The simplest solution is often a French drain. Known by other terms — a drain tile, a weeping tile or even a trench drain — the purpose of a French drain is fairly straightforward. These solutions collect and redirect water away from an area or a structure. There are other options available to solve these pesky issues, including an infiltration trench, which captures water where it is and allows it to soak into the soil instead of being redirected elsewhere.

It’s important to deploy the correct solution for your particular circumstance. In some instances, installing a French drain instead of an infiltration trench can violate municipal codes. In others, choosing the wrong drainage solution for the soil conditions present on the site can almost guarantee failure once the rains start falling again.

But when the time and place is right for a French drain, the installation process is often as straightforward as its purpose, as this month’s Step by Step demonstrates. 

STEP 1:
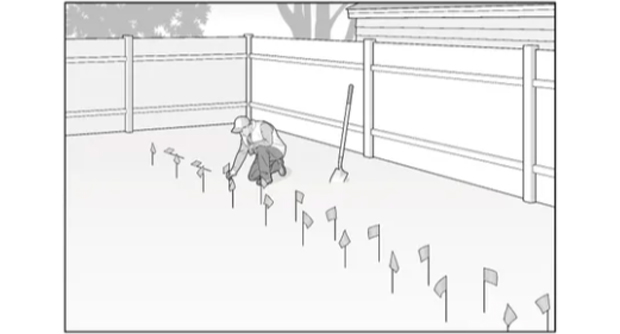
Plan the drainage strategy: Before breaking ground, pinpoint the wet spots and a viable discharge point and verify local drainage requirements. Set the grade and lay out the drain path using a consistent positive slope (typically ~one-percent grade) from the capture zone to the outlet. Use string and line levels or laser tools to help maintain accuracy. (Illustration: David Preiss)
Plan the drainage strategy. Before breaking ground, pinpoint the wet spots and a viable discharge point and verify local drainage requirements. Set the grade and lay out the drain path using a consistent positive slope (typically ~one-percent grade) from the capture zone to the outlet. Use string and line levels or laser tools to help maintain accuracy. (Illustration: David Preiss)

STEP 2:

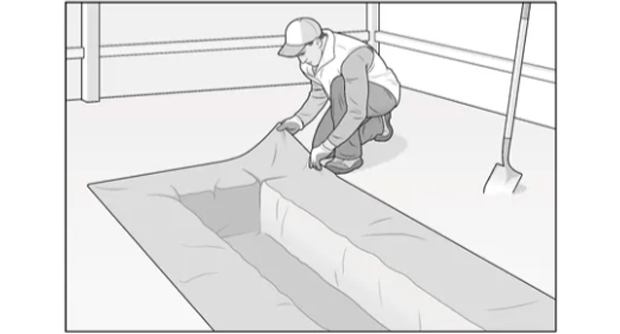
Excavate and line the trench. Excavate to the planned width and depth (commonly 12-18 inches wide, 18-24 inches deep) while maintaining grade. Line the trench with nonwoven geotextile fabric, leaving excess at the edges so you can wrap it over the stone later. (Illustration: David Preiss)

STEP 3:

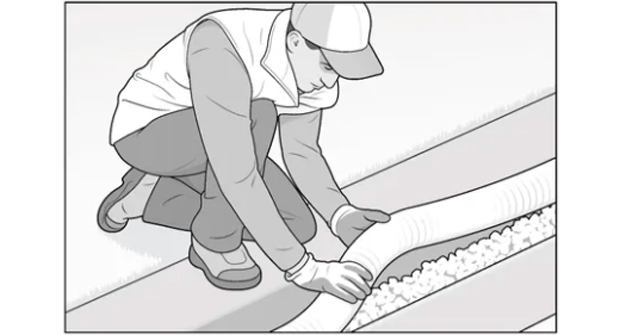
Prepare the base and place the pipe. Add a few inches of clean, washed gravel to create a stable base. Lay perforated pipe with holes facing downward to maximize infiltration, connect all fittings and check the slope again before covering. (Illustration: David Preiss)

STEP 4:

Backfill, wrap and finish. Cover the pipe with gravel up to a few inches of grade, fold the geotextile over to separate soil from rock and finish the surface with soil, sod or decorative stone tailored to the client’s expectations. (Illustration: David Preiss)

LM Staff

LM Staff

Landscape Management's staff brings together collective experience in journalism, research, writing, and editing. Our team stays tapped into the pulse of the industry, covering a wide range topics with a commitment to delivering compelling stories and high-quality content.

To top