Smart operators know that to get an even, clean cut every time, they need to keep their mower blades sharpened.
Start by referencing your equipment’s owner’s manual, and review the manufacturer’s recommendations on how to check, replace, sharpen and balance blades. Make sure you have all needed personal protective equipment (PPE). You should wear gloves when handling or working near the blades and eye protection when grinding.
Disconnect the mower’s spark plug wire so it doesn’t start while you’re working on the blade. Next, block the blade to keep it in place while you remove the mounting bolt and nut. Once you have the blade off the mower, use a grinder, hand file or electric blade sharpener on the blade. Run the blade perpendicular to the grinder to remove nicks.
Make sure to keep the original bevel when grinding by holding the blade at the proper angle, which is listed in the owner’s manual. Grind the blade until it’s sharp. Sharpen both blade edges equally, moving the blade back and forth across the grinder. If the blade becomes too hot while grinding, dip it in water to cool it.
After sharpening the blade, check that the cutting edge meets its manual’s specifications. If it’s too thin, the blade will be easily damaged. You also need to make sure the blade is balanced.
If it isn’t, the blade can cause mower vibration and damage. You can see if it’s balanced by sitting it on the center hole. The blade should be balanced when resting on the hole. If it’s not, grind down material from the back edge of the heavier side of the blade. When the blade is sharpened and balanced, reattach it to the mower.
Step 1
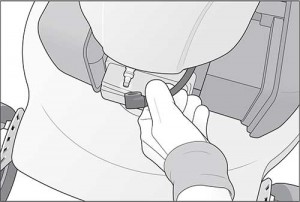
Put on gloves and eye protection, and disconnect the mower’s spark plug wire.
Step 2
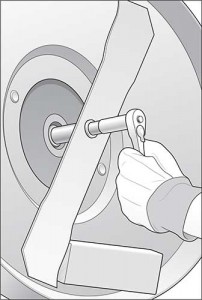
Block the blade, and remove its mounting bolt and nut.
Step 3
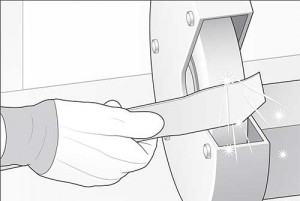
Use a grinder, hand file or electric sharpener to sharpen the blade. Hold it at the proper angle to keep the original bevel.
Source: Nick Minas, John Deere product manager